Mastering CI/CD: Deploy Script Pattern
The deploy script pattern offers a simplified approach to creating CI/CD pipelines by enabling developers to execute the pipeline from their local development machines.
In a previous article, I wrote about the benefits of the deploy script pattern in CI/CD pipelines. In this article, I’ll demonstrate an implementation. You will see how to use the same scripts to run a full pipeline on your local machine and GitHub Actions.
A frequent annoyance working with CI/CD pipelines is being unable to run them from your local machine. For every change you make, you must commit to GitHub and wait for your GitHub Actions (or Azure DevOps, Jenkins, etc) to run before finding out if your changes had the desired effect. That’s not so bad if your pipeline runs in a minute or so, but that is uncommon. You’re more likely to wait long enough to have forgotten what you changed, or worse, you’ve switched context and moved on to another task. Wouldn’t it be better to test your changes in mere seconds? If you can’t run the pipeline on your local machine, you must test in an environment with a larger feedback loop. The larger the feedback loop, the longer you wait to determine if your change worked.
What’s the deploy script pattern?
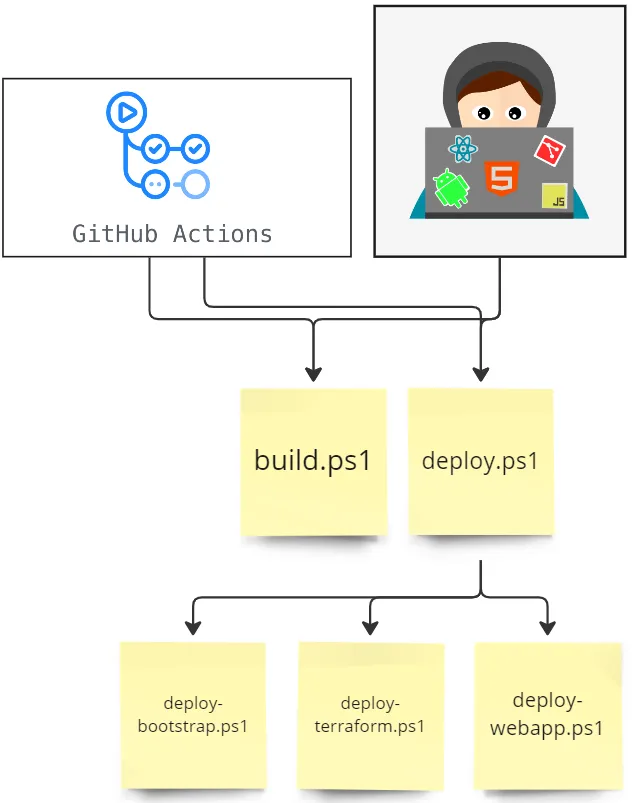
The idea behind the deploy script pattern is to build your pipeline in a script that can run anywhere. This script will do everything from compiling code and packaging artifacts to running Terraform and deploying websites. It is best to write two scripts, a build script and a deploy script. Each of these scripts may also call other scripts to perform a subset of the tasks. I can then call the build and deploy script from a single script from my local machine or GitHub Actions. I could swap out GitHub Actions for any other deployment tool, such as Azure DevOps.
About the demonstration
I’ve created a demo repo that contains a brand-new ASP.NET SPA app. Don’t worry if you are unfamiliar with this technology, as it’s not an important part of this discussion, and you don’t need to understand it. All you need to know is that when you build and deploy it, you end up with a very simple website that runs on a server. The repo also contains our CI/CD scripts.
You can find the GitHub repository here: https://github.com/seanke/ViteAspNetExample.
The majority of the environment is deployed using Terraform. An App Service, an App Service Plan, and a SQL Server and Database. However, a few resources are set up at the start of the deployment using the Azure CLI. The Azure CLI also deploys the website artifacts. I find Terraform is good at deploying most resources, but it is problematic with some, for example, Azure Key Vault. Finally, our built website is deployed into an App Service via PowerShell.
The build script should be called first. It will create artifacts that the deploy script will deploy.
Note: Your deployment should be idempotent
Idempotent means writing code that can be run multiple times without causing unexpected changes or behaviour. This is achieved by including checks to ensure certain actions are only taken once. It increases reliability and allows safe automation.
Build script
The build script has one job, producing artifacts ready to be deployed. Your deploy script should take no arguments. It should run unit tests and should fail if anything goes wrong. Our example is very simple and just compiles the website code and then adds it to a zip file.
Build.ps1otnet publish "./../WebApp/WebApp.csproj" `
  --configuration Release /p:DebugType=None `
  --output "./../.build/WebApp"

if($LASTEXITCODE -ne 0){
  throw
}

Compress-Archive `
  -Path "./../.build/WebApp/*" `
  -DestinationPath "./../.build/WebApp.zip" `
  -Force

Remove-Item "./../.build/WebApp" `
  -Recurse `
  -ErrorAction SilentlyContinue
On the first line, we run ‘dotnet publish’, which produces combined code. Then we check that ‘dotnet publish’ has been successfully executed by checking that the last exit code is not ‘0’. If it fails to run successfully, we ‘throw’, which will cause the build to fail.
Then ‘Compress-Archive’ is run, which places all our compiled files into a zip file ready to deploy.
Finally, ‘Remove-Item’ deletes files created during the build process that are no longer required.
The build script gets artifacts ready to be deployed. It’s important that the same artifacts can be deployed to all environments, I.E. dev, uat and prod. Your build script should not produce one zip file for dev, another for uat, and one more for production. The same zip file should be deployed to all environments. Occasionally you will find scenarios where it takes extra effort to make this work, but it will pay off.
Deploy script
What the Deploy Script should do:
- Create or update cloud infrastructure
- Execute Terraform Init and Apply
- Deploy website artifacts
- Run tests on the environment to ensure the deployment is successful
What the Deploy Script should not do:
- Compile code into deployable artifacts
- This should be done in the build script
- Install software on the machine the script is running
- The deploy script should expect software such as Terraform and Azure CLI and already installed
The deployment script is more complex than the build script. Its job is to create an environment and deploy the artifacts produced by the build script. Ideally, your deploy script should only take one argument, the name of the environment to deploy to, for example, dev, uat or prod.
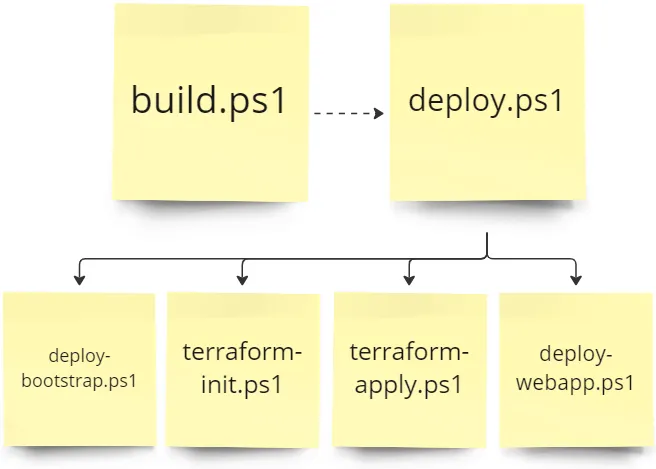
I split the deploy script into multiple scripts with a parent script.
The parent script is deploy.ps1. It calls all other deploy scripts.
param($EnvironmentSuffix)

./deploy-bootstrap.ps1 $EnvironmentSuffix
./deploy-terraform-init.ps1 $EnvironmentSuffix
./deploy-terraform-apply.ps1 $EnvironmentSuffix
./deploy-web-app.ps1 $EnvironmentSuffix
The deploy script takes an environment argument. It may also take secrets as arguments, however it is more secure and easier to use if the secrets are stored somewhere. I use a Azure Key Vault to store my secrets.
The first script that the deploy script calls is the deploy-bootstrap.ps1 script. This script sets up Azure resources required by the rest of the deployment. It creates a Resource Group, KeyVault, and a Storage Account.
Key Vault is setup with permissions for the account running the deploy script to have access to create new secrets. A new SQL server password is added to the KeyVault, which will be used at a later stage to create an Azure SQL Server.
This script is the most complex of all scripts in the pattern.
param($EnvironmentSuffix)

if (-not $EnvironmentSuffix) {
    throw "EnvironmentSuffix not provided"
}

.\deploy-azure-set-subscription.ps1 $EnvironmentSuffix

######### LOAD CONFIG FILE #########
$config = Get-Content `
  "config.$EnvironmentSuffix.json" | Out-String | ConvertFrom-Json

$SubscriptionId = $config.azureSubscriptionId
$Location = $config.azureLocation
$AppName = $config.appName

$resourceGroupName = "$AppName-rg-$EnvironmentSuffix"
$storageAccountName = $AppName + 'storage' + $EnvironmentSuffix

######### CREATE RESOURCE GROUP #########
Write-Output "Setting up resource group"

az group create `
    --location $Location `
    --name $resourceGroupName `
    --subscription $SubscriptionId
if($LASTEXITCODE -ne 0){
    throw "Error creating resource group"
}

######### CREATE KEY VAULT #########
$createKeyVault = {
    param (
      $KeyVaultName,
      $KeyVaultResourceGroupName,
      $KeyVaultLocation,
      $KeyVaultSubscriptionId)

...

...

}
$createKeyVaultResult  = Start-Job `
    -Name "CreateKeyVault" `
    -ScriptBlock $createKeyVault `
    -ArgumentList @(
      "$AppName-kv-$EnvironmentSuffix",
      $ResourceGroupName,
      $Location,
      $SubscriptionId)

$createStorageAccount = {
    param (
      $StorageName,
      $StorageResourceGroupName,
      $StorageSubscriptionId)

...

...

}
$createStorageResult = Start-Job `
    -Name "CreateStorageAccount" `
    -ScriptBlock $createStorageAccount `
    -ArgumentList @(
      storageAccountName,
      ResourceGroupName,
      SubscriptionId)

$createStorageResult | Wait-Job
$createKeyVaultResult | Wait-Job

...
It’s worth noting that this PowerShell script makes use of Jobs. Jobs are a way of running PowerShell asynchronously. This can complicate your code but will speed up deployment. I have chosen to accept the extra complication in this script.
The next script that the parent script calls is the Terraform initialise script.
...

######### CLEAR TERRAFORM CACHE #########
Set-Location ../Terraform
if (Test-Path .terraform/terraform.tfstate)
{
    Remove-Item .terraform/terraform.tfstate
    Write-Output "Removed .terraform/terraform.tfstate"
}

######### SETUP TERRAFORM BACKEND CONFIG #########
$initResourceGroupCommand = '-backend-config="resource_group_name=' `
  + $TerraformStateResourceGroupName + '"'

$initStorageAccountCommand = '-backend-config="storage_account_name=' `
  + $TerraformStateStorageAccountName + '"'

$initContainerCommand = '-backend-config="container_name=' `
  + $TerraformContainerName + '"'

$initStateKeyCommand = '-backend-config="key=' `
  + $TerraformStateKey + '"'

######### RUN TERRAFORM INIT #########
Write-Output "Starting terraform init"
  terraform init `
  $initResourceGroupCommand `
  $initStorageAccountCommand `
  $initContainerCommand `
  $initStateKeyCommand `
  -upgrade

...
This connects us to the Terraform state file stored in the Azure Storage Account, which was setup by the bootstrap script. Then we run the Terraform apply script.
...

terraform apply $environmentSuffixVarFlag $autoApproveFlag $noInputFlag

...
Finally, we run the web app deploy script. This will deploy our code into the App Service, which Terraform setup for us.
...

az webapp deploy `
  --resource-group $resourceGroupName `
  --name $webAppName `
  --src-path $zipFilePath `
  --type zip `
  --only-show-errors

...
Running on your local Dev machine
You should be able to run your build and deploy scripts on your local dev machine. If you can’t run your scripts locally, you will have no way to test your scripts other than committing changes to Git and running the pipeline in GitHub.
Running in GitHub Actions
The deploy script pattern can be easily integrated into GitHub Actions, allowing for automated deployment and testing. You can create a YAML file in the repository’s .github/workflows directory to define your workflow.
...

jobs:
  build:
    runs-on: ubuntu-latest
    steps:
      - uses: actions/checkout@v2

      - uses: actions/setup-dotnet@v1
        with:
          dotnet-version: '7.0.x'

      - name: Build
        working-directory: Cicd
        run: ./build.ps1
        shell: pwsh

      - name: Archive .build
        uses: actions/upload-artifact@v2
        with:
          name: .build
          path: .build

  deploy-dev:
    needs: build
    runs-on: ubuntu-latest
    concurrency: deploy-dev
    steps:
      - name: Azure Login
        run: >
          az login --service-principal
          -u ${{ secrets.AZURE_CLIENT_ID }}
          -p=${{ secrets.AZURE_CLIENT_SECRET }}
          --tenant ${{ secrets.AZURE_TENANT_ID }}

      - uses: actions/checkout@v2

      - name: Download Archive
        uses: actions/download-artifact@v2
        with:
          name: .build
          path: .build

      - name: Run Dev
        working-directory: Cicd
        run: ./deploy.ps1 dev
        shell: pwsh

...
Running in Azure DevOps
In the repository, there is a yaml pipeline that can be used in Azure DevOps too.
Conclusion
In conclusion, implementing the deploy script pattern in your CI/CD pipelines can significantly reduce the time it takes to test changes by allowing you to run the pipeline on your local machine. Furthermore, the scripts created in this pattern can be easily used across different deployment tools, making it highly versatile. By following the pattern outlined in this article, you can create maintainable build and deploy scripts, which can reduce the likelihood of issues arising from different builds for different environments.